Dask revisited, and how to use dask as a general parallel compute engine

The thing about learning new libraries is that, the first time you're exposed to them, you're probably using them the wrong way. Only after repeatedly reading documentation and trying new ways to use the library do you end up finding newer and (possibly) better ways to do things.
In this case, it's been a while since I talked about dask, so I'd like to revisit how to use dask.
Dask is more than just parallel pandas
It's a very easy mental model to just call Dask a parallelized version of pandas, and that's not incorrect.
The dask dataframe has fairly strong parity with many popular pandas dataframe operations.
Wherever you might be calling pandas.DataFrame, you could just as easily call dask.DataFrame.
This mental model is really great at hiding any of the underlying implementation details of dask (and dask dataframes), so it's great for beginners.
If we look further, we can add to this mental model as such: Dask operates by distributing (dataframe) operations on small chunks of data (Pandas DataFrames). Now, we understand that Dask is actually orchestrating and scheduling tasks to operate on out-of-memory chunks of data. At this point, we can understand Dask is really a good parallel compute engine, and this might be useful for the grad students submitting serial python code to a cluster that has multiple cores that need to be leveraged.
from dask.distributed import Client
client = Client()
client
client.close()
I've actually come to appreciate a separation of client + notebook, where I'll actually use the Dask CLI to create a Client object, then connect to this client within the notebook. This also naturally extends itself to connecting to remote clusters if your tech stack so allows it.
There are two steps to getting this client going:
- Create the dask scheduler object, in this case I specify the host as just local
$ dask-scheduler --host localhost
distributed.scheduler - INFO - -----------------------------------------------
distributed.http.proxy - INFO - To route to workers diagnostics web server please install jupyter-server-proxy: python -m pip install jupyter-server-proxy
distributed.scheduler - INFO - -----------------------------------------------
distributed.scheduler - INFO - Clear task state
distributed.scheduler - INFO -   Scheduler at:      tcp://127.0.0.1:8786
distributed.scheduler - INFO - dashboard at: 127.0.0.1:8787- In another tab/window, create the dask workers. In this case, I specify how to connect to the scheduler, with specifications on how mnay processes and how many threads per process
$ dask-worker localhost:8786 --nprocs 2 --nthreads 1
distributed.nanny - INFO -         Start Nanny at: 'tcp://127.0.0.1:34157'
distributed.nanny - INFO -         Start Nanny at: 'tcp://127.0.0.1:35317'
distributed.worker - INFO -       Start worker at:      tcp://127.0.0.1:40601
distributed.worker - INFO -          Listening to:      tcp://127.0.0.1:40601
distributed.worker - INFO -          dashboard at:            127.0.0.1:45819
distributed.worker - INFO - Waiting to connect to:       tcp://localhost:8786
distributed.worker - INFO - -------------------------------------------------
distributed.worker - INFO -               Threads:                          1
distributed.worker - INFO -                Memory:                 695.88 MiB
distributed.worker - INFO -       Local Directory: /home/ayang41/dask-worker-space/worker-yve3mz6t
distributed.worker - INFO - -------------------------------------------------
distributed.worker - INFO -       Start worker at:      tcp://127.0.0.1:40317
distributed.worker - INFO -          Listening to:      tcp://127.0.0.1:40317
distributed.worker - INFO -          dashboard at:            127.0.0.1:46271
distributed.worker - INFO - Waiting to connect to:       tcp://localhost:8786
distributed.worker - INFO - -------------------------------------------------
distributed.worker - INFO -               Threads:                          1
distributed.worker - INFO -                Memory:                 695.88 MiB
distributed.worker - INFO -       Local Directory: /home/ayang41/dask-worker-space/worker-n5bnjbki
distributed.worker - INFO - -------------------------------------------------
distributed.worker - INFO -         Registered to:       tcp://localhost:8786
distributed.worker - INFO - -------------------------------------------------
distributed.core - INFO - Starting established connection
distributed.worker - INFO -         Registered to:       tcp://localhost:8786
distributed.worker - INFO - -------------------------------------------------
distributed.core - INFO - Starting established connection- Back on the scheduler, we can see the scheduler has identified two new workers
distributed.scheduler - INFO - Register worker <WorkerState 'tcp://127.0.0.1:40601', name: tcp://127.0.0.1:40601, memory: 0, processing: 0>
distributed.scheduler - INFO - Starting worker compute stream, tcp://127.0.0.1:40601
distributed.core - INFO - Starting established connection
distributed.scheduler - INFO - Register worker <WorkerState 'tcp://127.0.0.1:40317', name: tcp://127.0.0.1:40317, memory: 0, processing: 0>
distributed.scheduler - INFO - Starting worker compute stream, tcp://127.0.0.1:40317
distributed.core - INFO - Starting established connection
client = Client('localhost:8786')
client
Miraculously, once you've connected to the client, all subsequent Dask operations will leverage this client
import dask
import dask.dataframe as dd

# Make some random data
df = dask.datasets.timeseries()
With this random data, we can see that we don't actually "have" the data yet, we have the tasks to create the data
df
Just like Pandas, we can put together some groupby-agg operations. Unlike Pandas, this is a lazy evaluation where the computation hasn't actually happened
some_groupby_agg_operation = df.groupby('name').agg({'x': 'max', 'y': 'mean'})
some_groupby_agg_operation
Visaulizing the tasks, where each color is a different operation, and each row is a dask worker
We can also look at how the scheduler is going to execute on these tasks (kind of like the execution plan from spark)
some_groupby_agg_operation.dask.visualize()
some_groupby_agg_operation.visualize()

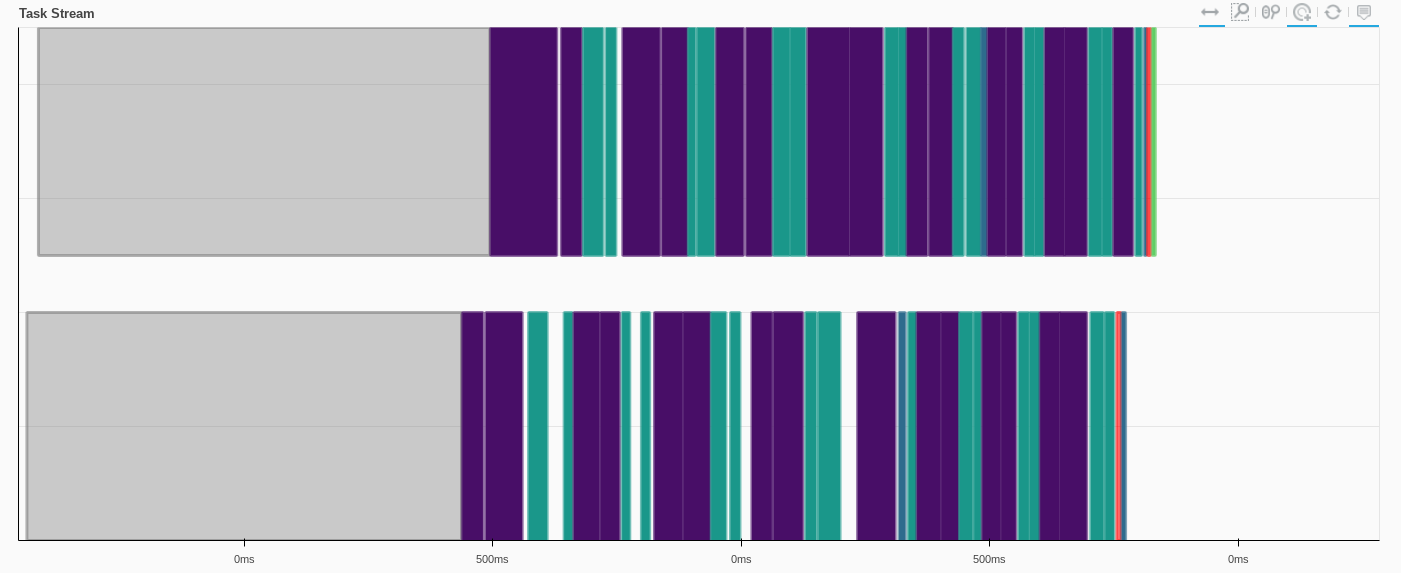
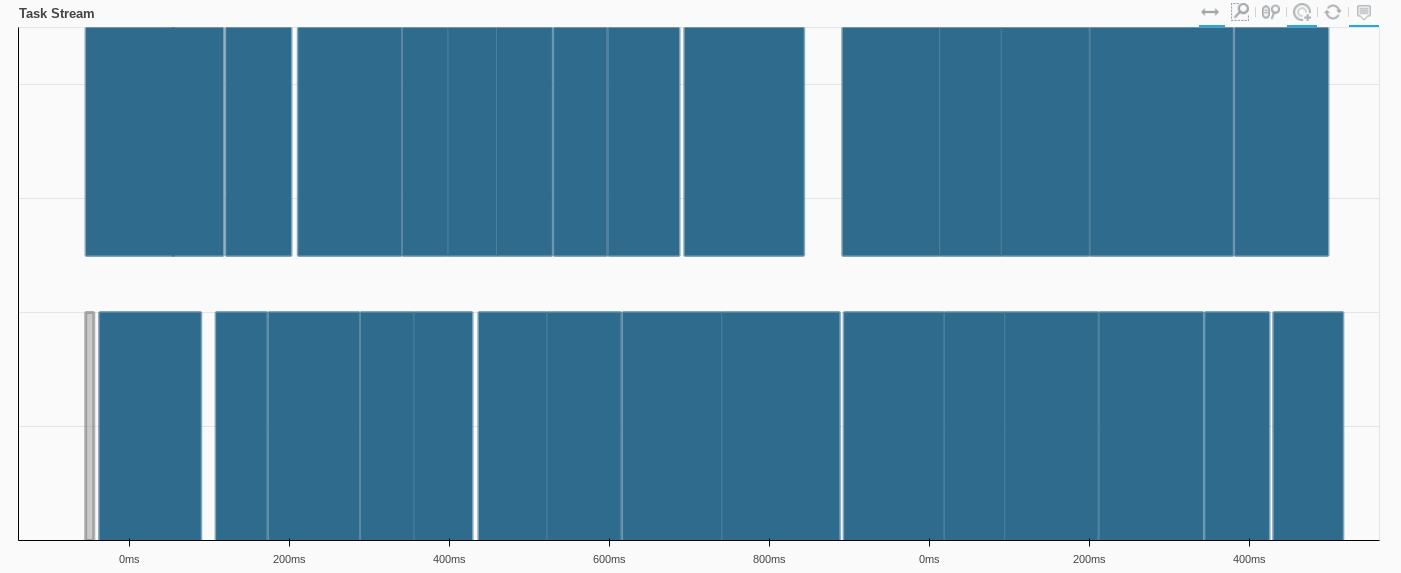
Now we actually crunch the tasks, and we can see the operation happening in the Dask dashboard, where each color corresponds to a particular operation
some_groupby_agg_computed = some_groupby_agg_operation.compute()
And now we've computed the operation, but the actual content isn't relevant here
some_groupby_agg_computed.head()
df['x2'] = df['x'].apply(lambda val: val**2)
Again, the lazy evaluation means this column is "scheduled" into the dataframe, but not yet computed
df
applied_computation = df.compute()
Map partition functions
Map partition operations are great for taking complex Pandas dataframe operations, but "fanning" it out to all the Dask DataFrame partitions. Generally, the refactoring necessary to go from Pandas to a Dask map_partition function can be straightforward.
For example, if you had some large-ish code to act on multiple columns and create multiple columns, you might wrap it into a single function that takes in a Pandas dataframe and returns a Pandas dataframe.
You could also imagine breaking up this function to two functions, one for each new column. Sometimes this adds overhead to the scheduler because you're scheduling two functions instead of one
def my_multi_function(df):
    df = df.assign(
        big_string=df['id'].astype(str) + "-" + df['name'],
        new_value=df['x'] + df['y']
    )
    return df

multi_df = df.map_partitions(my_multi_function)
multi_df
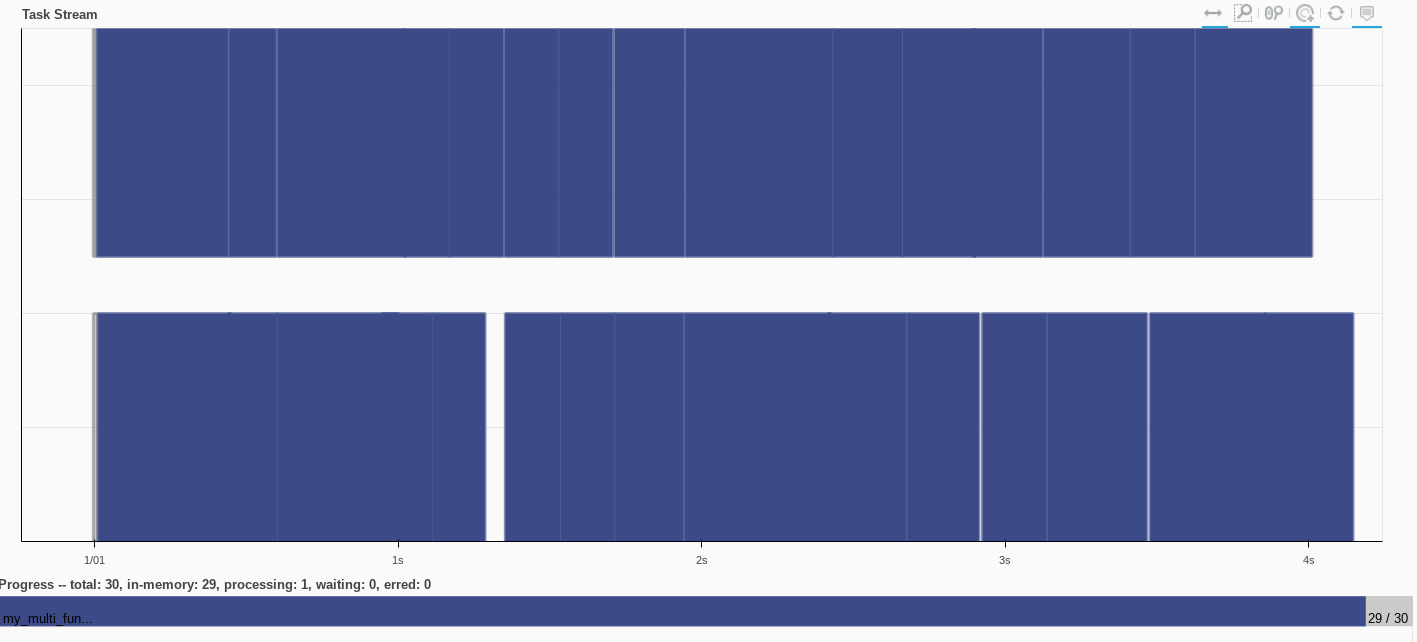
multi_df_computed = multi_df.compute()
multi_df_computed
Final words on some dask dataframe operations
If you need to beef up your Pandas computations, then it's reasonable to use some Dask functions. In some situations, you can use the Dask functions to boil down your data into an eventual Pandas dataframe, and go about your work.
I also want to suggest an alternative, avoiding this use of Pandas/Dask in the first place. For a lot of data scientists who come from more of a coding/scripting + academic background, falling back to Python libraries is safe and popular because the data tend to be safely stored locally (or stored elsewhere and easy to load/stream into memory). However, I've found many operations can easily be done with a SQL client (sqlworkbench, snowflake, athena, your company's inhouse sql). The beauty here is that the computations with SQL clients are generally offloaded from you measly laptop and closer to your SQL engine, where it's probably even faster to connect/load data, and the basic SQL operations are just as easily optimized and parallelized with the underlying SQL engine.
Create a Person object with some properties like a personal value
from random import random

class Person:
    personal_value: float
    name: str

    def __init__(self, name: str):
        self.name = name
        self.personal_value = random()

    def __repr__(self):
        return f"<{self.name}, {self.personal_value}>"
Generate some names, create Person objects
all_names = df['name'].unique().compute()
list_of_people = [
    Person(name)
    for name in all_names
]
list_of_people
Simple function we're going to perform, take two Person objects and add their values
def add_two_people(a: Person, b:Person) -> float:
    return a.personal_value + b.personal_value
Use dask delayed to create a bunch of tasks we want to perform
import itertools as it
from dask import delayed

delayed_operations = [
    delayed(add_two_people)(person1, person2)
    for person1, person2 in it.permutations(list_of_people, 2)
]
We have a list of delayed operations. These add_two_people functions haven't yet been computed, but we've created the tasks in which we compute them
delayed_operations[:10]
Visualizing this is pretty simple because we're only doing one operation
dask.visualize(delayed_operations[:10])

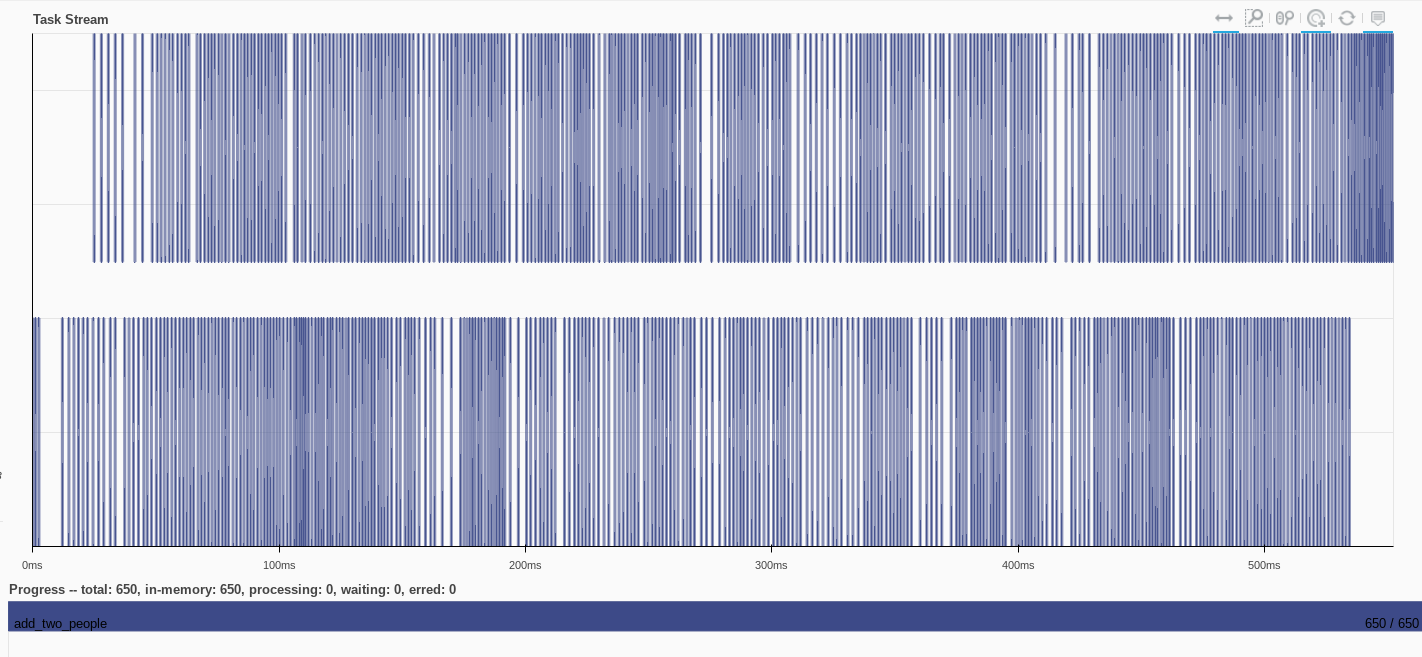
Actually compute the operations
added_operation = client.compute(delayed_operations)
Each computed operation is a Future object, from which we need to pull the real result
added_operation[:5]
added_operation[0].result()
scattered_list_of_people = client.scatter(list_of_people)
scattered_list_of_people
New operation is just to add an arbitrary int to a Person's value
def add_a_value(p: Person, v: int):
    return p.personal_value + v
The syntax is the same, but the nuance here is we're passing these scattered Person objects
delayed_operations = [
    delayed(add_a_value)(scattered_person, i)
    for i, scattered_person in enumerate(scattered_list_of_people)
]
The dask graph still looks very similar as before, we're just doing a single task over and over, on some different input data
dask.visualize(delayed_operations[:10])

And we can use our client to compute the operations as before
computed_add_operation = client.compute(delayed_operations)
The task stream shows the scattered Person objects in addition to the add_a_value functions
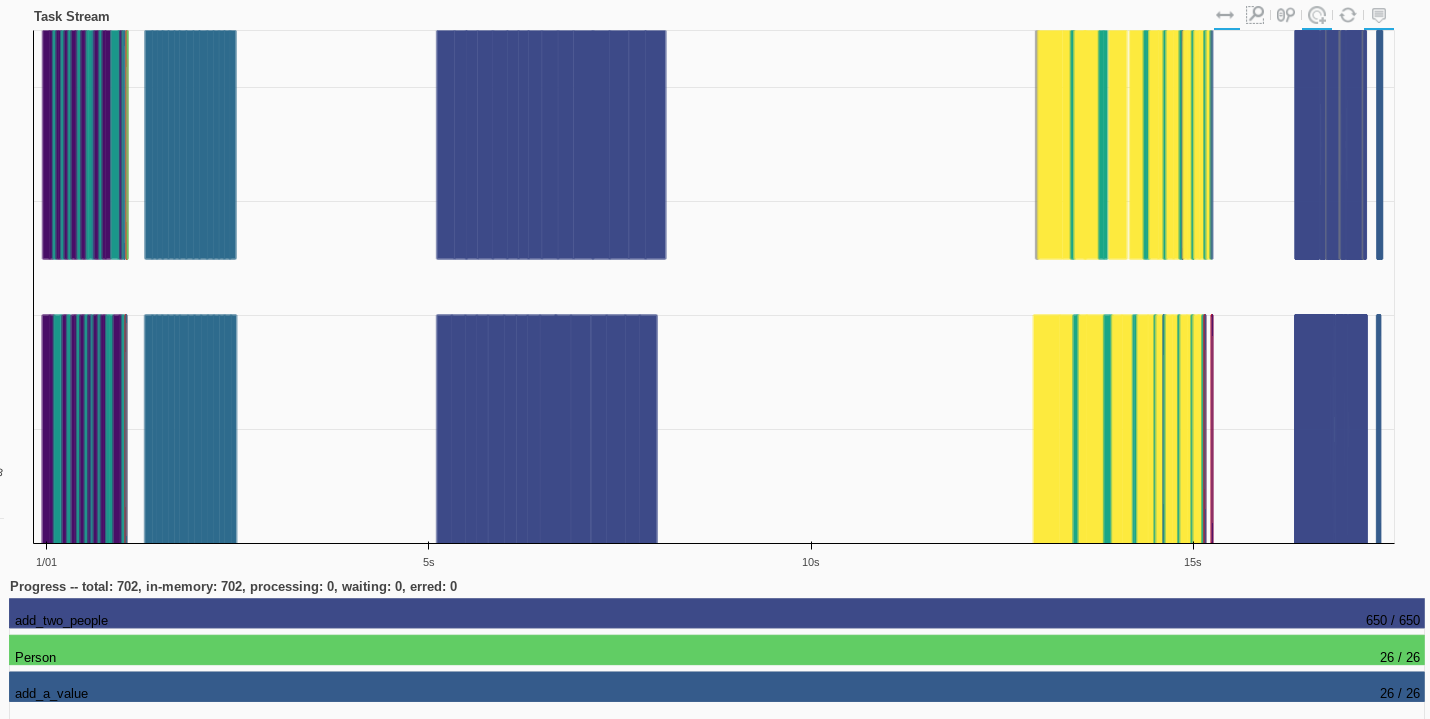
computed_add_operation[0].result()
A more applied example, let's say you have a model you want to do some parallel predictions on
from sklearn.linear_model import LinearRegression
import numpy as np

X = np.random.random(100)
y = np.random.random(100)
my_model = LinearRegression().fit(X.reshape(-1,1), y)
X_new = np.random.random(10)
Again, define a function, and use the delayed wrapper to schedule a bunch of operations
def run_prediction(model, x):
    return model.predict(np.array(x).reshape(-1,1)) # Doing some array-reshaping to fit required predict formats

my_model_scattered = client.scatter(my_model)
lots_of_predictions = [
    delayed(run_prediction)(my_model_scattered, val)
    for val in X_new
]
Then compute the operations
predictions = client.compute(lots_of_predictions)
predictions[0].result()
Parting thoughts, Dask can be used as multi-processing engine
While dask.DataFrame has a lot of parity with pandas.DataFrame such that you can supercharge your pandas-code, you can also use Dask to handle arbitrary python objects.
In doing so, you open a lot of additional code up for parallelization. With operations like scatter, you can also observe some parallelization optimizations that you might not observe from using something built-in like concurrent.futures
Because python code is generally serial in operation, if you submit python code to a cluster, you might not be successfully leveraging all the the cores available. The use of dask, delayed, and even scatter will help add some straightforward parallelization