
Molecular Modeling Software: Foyer
Published:
Foyer
Foyer is an open-source Python package, part of the MoSDeF suite of tools for molecular modeling. In the description: “a package for atom-typing as well as applying and disseminating forcefields.”
Reading Check
If you don’t know what atom types or force field parameters are, I suggest reading this post to catch up. If you’re new to molecular modeling, try this or that
Overview
The basic idea behind Foyer is to assign atom types and force field (FF) parameters given an arbitrary chemical topology (bonding network). Anyone who has worked in modeling knows this is a daily frustration. Further, the process is aimed at being transparent - how each atomtype gets chosen, what the various force field parameters are - and easily share-able - a Python script that constructs your system and utilizes Foyer to atomtype and parametrize accroding to a share-able, human-readable force field file (XML-style).
For most molecular modelers, we rely on other software like antechamber, ligpargen, charmm-gui, cgenff, etc. to atomtype and parametrize. In goes the structure, out come the FF parameters, and pray it works. Fairly black box, no flexible API to modify the process. For as complicated as we will see the Foyer API to be, the underlying FF parameters and atom types are easy to debug and modify. As it stands (September 2019), there is good support for the OPLS-AA force field provided with Foyer, and more in development. Contributions from others are always welcome, especially trying to get the more general force fields codified and shared.
This post is going to start from general Foyer API and work flow to finer-detailed explanations of particular routines. So hop on the train and feel free to hop off as you see fit. For users, you might not need to read the whole thing. For debuggers, developers, and maintainers, it might help to stay to the end. If you wanted code-examples and tutorials, I recommend you look through the MoSDeF organization and Foyer repos. There are lots. If you wanted the big ideas and concepts, I refer you to the Credits at the end of this post for the publication and related manuscript. My aim is to help elucidate the code design and each routine.
The Foyer force field XML
A molecular mechanics force field defines the atoms and atom types within a chemical system. The Foyer force field XML derives and builds upon the OpenMM force field XML Furthermore, the interaction parameters are also specified (bonds, angles, dihedrals, nonbonded interactions). The available functional forms and units are based on OpenMM style. Foyer-supported parameters are here
Below is a small example of an XML file 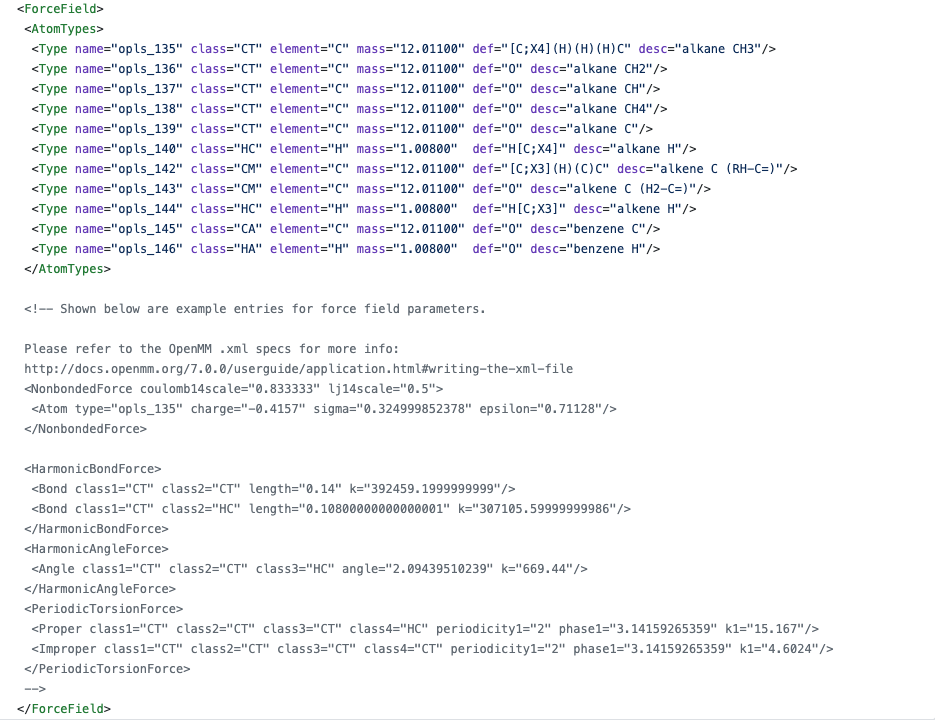
The heading <AtomTypes> defines the different atom types within the FF. The attribute name defines the name of the atom type, and it is unique. No other atom types can have the same name. The attribute class defines a broad category that can encompass multiple atom types (notice how there are multiple class="CT"). Multiple atom types can belong to the same class, and this can help down the line if you want to assign parameters to an entire class, not just a specific, unique atom type. Mass is self-explanatory, amu. desc is a human-readable description to help understand the atomtype. There is also an additional doi attribute, which is useful for citing the relevant papers where those FF parameters were published.
def and overrides are where Foyer really makes its money. Foyer-documentation here. def refers to a SMARTS string that defines the bonding and chemical context of the atom of interest. At its most basic, you could use SMARTS strings to uniquely define sp3, sp2, and sp hybridized carbons (4, 3, and 2 bonded partners, respectively). SMARTS is not developed by the MoSDeF group, but rather utilized by us. SMARTS is similar to SMILES in that they are strings that define chemistry, but SMILES defines molecules; SMARTS defines patterns. SMARTS theory here. There is a lot of chemistry/bonding that can be defined via SMARTS, only a subset is supported in Foyer so far. In the image posted above, many definitions are missing, but the ones that are filled-in will describe alkane CH3, alkane H, alkene C, and alkene H. Based on SMARTS definitions, Foyer detects all the possible SMARTS pattern matches for every atom.
SMARTS-strings can be as general or specific as you want. This is helpful for implementing some force fields, or developing a new atom type that should only be used in a very particular molecular pattern. If a particular atom satisfies multiple SMARTS definitions, and thus could be multiple atom types, Foyer helps narrow down to a single atom type via overrides. No easy examples to show, but here you can find oplsaa.xml with examples of overrides. Here’s a use-case, you have a carbon that fits atomtypes C1, C2, C3, and C4. But you also have overrides definied, such that C2 overrides C1, C3 overrides C2, and C4 overrides C3. Alternatively, you could have C4 override C3, C2, and C1. Because of this priority/precedence, your carbon will get defined as C4.
The remaining sections within the FFXML file outline the different forces that this FF implements. Again, the Foyer-supported parameters are here, and we derive these objects/forces from OpenMM-style here. If you wanted to incorporate a new functional term, it would have to abide by the OpenMM conventions prior to being implemented within Foyer.
Foyer Forcefield class
We’ve outlined the FFXML, but now we need to create an object from this text. This is where the Forcefield class comes into play. The class is defined in here. The Foyer FF class inherits from the OpenMM FF Class, so some functionality gets re-used (one example is the parameter assignment is taken from the OpenMM FF). Within the Foyer FF class, there is the Foyer-specific information like definitions, overrides, descriptions, dois, etc. Within the OpenMM FF class (the superclass), there is the OpenMM information like the atom types and forces, among other fields that don’t get utilized in Foyer.
In addition to creating digitizing the FFXML into a FF object, the forces also described in the FFXML also get turned into their own Force objects.
In actuality, the forces described in the FFXML get turned into ForceGenerators like this. Further down the pipeline/workflow, these generators will later create their respective Force objects, which are found elsewhere in the OpenMM C code.
In summary, the Foyer FF class turns the FFXML into a data structure that contains information about the atomtypes, classes, forces, and everything else that went into the FFXML.
Applying a Foyer FF
We now have our FF object with which we can interact using Foyer’s API. The next thing is to take this FF and apply it to our chemical system of choice, identifying the atom types and interaction parameters according to the FF, thus building our molecular model. Correspondingly, the method is Forcefield.apply
The apply step can be broken into 4 steps
FF Applying, step 1: Preparing a topology
To apply a force field, you need to provide a chemical topology. This topology needs to know the elements of all the atoms/particles in your system, and all the bonds between them. There are MANY flavors of a chemical topology, but they all end up converted to an OpenMM.Topology. Additional information in the OpenMM.Topology include residues and chains. Thus far, only residue functionality is encoded; while residues are technically associated with proteins and amino acids, residues can also generically refer to a molecule type in our system (if you have a box of ethanes and methanes, then all the ethanes would be of the ethane residue, even if you have 10 distinct ethane molecules)
FF Applying, step 2: Atomtyping
After consolidating any chemical topology input into an OpenMM.Topology, we now iterate through the atoms to identify each atom’s atom type. This is the majority of the Foyer API. The gist is that we try to find all the SMARTS patterns and atom types that fit each atom in our topology. Using overrides functionality, we help narrow down a list of possible atom types to a single one. This is often a pain point in the Foyer workflow, as sometimes overrides or SMARTS definitions are poorly defined. If overrides are not sufficiently defined, narrowing down the possible atom types to just one will not work. If SMARTS definitions are not sufficiently defined, some atoms in your topology will not fit any atom type as defined in your FFXML (or maybe something was wrong with your chemical topology).
If you are interested in digging deeper into the Foyer atomtyping API, there will be sections later in this post.
FF Applying, step 3: Parametrize the forces
Once all atom types have been detected within our topology, we use some functionality from OpenMM to parametrize all the interactions within our chemical system.
Remembering that the FFXML -> FF object actually conatined ForceGenerators, not the actual Forces, this step now creates the Forces and identifies all the relevant atoms, bonds, angles, dihedrals, etc. to which that Force applies.
This step yields an OpenMM.System object. Within the Foyer workflow, this gets converted to a ParmEd.Structure.
FF Applying, (optional) step 4: Validation
When building a molecular model, sanity checks are necessary. Do all bonds have parameters defined? What about angles and dihedrals? Foyer includes functionality to sanity check the resultant parametrized ParmEd.Structure. As a note, most (if not all) FFs define bond interactions (two-atom partners directly bonded). Angles and dihedrals may not always be defined or parametrized within that FF, and that’s okay if that’s what the FF correctly states.
Additionally, if the FFXML had DOIs associated with it, the DOIs get written to a bibtex file, helpful for properly citing and crediting authors of the FF.
Done applying a Foyer FF
At this point, we have a parametrized ParmEd.Structure object, in which all atoms have atom types, and all physical interactions are defined with parameters (provided they were specified in the FFXML). From this ParmEd.Structure we perform a variety of different data structure conversions or I/O to different file formats suitable to the engine of choice.
If you are using or interested in using Foyer, hopefully this is enough design and implementation detail to get you comfortable with the API. The goal is to provide a tool that helps atomtype and parametrize arbitrary chemical systems in a manner that users can walk through, debug, and fine-tune a force field as necessary.
An in-depth dive into the Foyer API
If you are a maintainer or developer of Foyer, this will hopefully help you get a better sense of how the code works, as a lot of the internal API is hidden from users. We will, once again, walk through the Foyer API and workflow, but with a lot more detail.
I want to make something very clear: I hope this serves as a helpful reference for people getting familiar with the entire API, but a well-trained developer should eventually outgrow this post and hopefully be able to write their own walkthroughs, as this will demonstrate, exercise, and force the developer’s own fluency with the Foyer API.
More about the Foyer FFXML and Forcefield
The FFXML does follow the XML structure, and can be manipulated using lxml or xml Python libaries.
If you are writing your own FFXML file, creating a Forcefield object includes a “validation” step, checking to see if your own FFXML fits the style laid out in Foyer. Programatically, this is done as an XML schema document here. Most of time, you will not have to interact with this document unless you are incorporating a new functional form within Foyer and your Foyer FFXML. The general idea is for every XML element, you specify possible attributes and their data types. If there are nested XML elements, you can specify those too.
After the validation step, there are some initializing operations. These initializing operations include processing the FFXML files using some regex operations, and calling the superclass (OpenMM FF) __init__ function. This is an interesting use of Python and its super/subclass functionality, on this line, we call the superclass’s __init__, which calls OpenMM.Forcefield.loadFile, which calls OpenMM.Forcefield.registerAtomType. All the OpenMM FF stuff can be found here. BUT, we are NOT actually using OpenMM.Forcefield.registerAtomType, we have overridden this function with Foyer.Forcefield.registerAtomType, which is written here. So there’s a lot of super/subclass interaction and function overriding.
I bring this up because this is where Foyer identifies the non_element_types (names of particles that don’t fit within the periodic table of elements). This is useful for systems that introduce new particles, like coarse-grained methods (“_myBead” vs “myAtom”). The difference between elemental and non-elemental is denoted by the use of an underscore before the actual name of your particle. In reality, this is mainly done because a lot of elemental detection is done by inferring from the particle name and elemental symbol.
Lastly when creating the Foyer.FF object, we initialize the SMARTS Parser, and pass the non_element_types we detected when reading in the FFXML.
The SMARTS Parser
SMARTS as a human-readable language designed to encode chemical and stereochemical bonding patterns in text. Now that it’s human-readable, we need to develop a “grammar system” for a computer program to decipher SMARTS strings. This is handled within our SMARTS class here. The file is short, but there’s some key pieces of information here. First, we create a really long string GRAMMAR that encodes all the different symbols and characters that could yield a valid SMARTS string. Some symbols are operators that denote relationships or properties, others are terminals that are the objects that comprise these relationships. In mathematical examples, parentheses, additions, subtractions, etc. are relationships or properties, but the numbers or variables themselves are the terminals. To read more about this, I direct you to the Wikipedia article about LALR parsing. Computer science grammar parses are a wicked rabbit hole. Within GRAMMAR, we also have some string formatting - notice the last line in the GRAMMAR string is a long string of symbols. These are atomic symbols, just disguised. C[laroudsemf] will refer to the symbol C, Cl, Ca, Cr, etc. But there’s also the curly braces {optional}, which is where we will do some string formatting and insert the non_element_types.
Second, there is the actual SMARTS object whose property is this GRAMMAR string, but now we’ve formatted the string to fill in the {optional} symbols with the non_element_types we found earlier. If you’re going to perform SMARTS-matching, you need to make sure all your symbols (elemental or not) get captured within the SMARTS object, which is created when we read in the FFXML and registerAtomTypes.
Lastly, we have a property for the self.PARSER, which utilizes an external library, to take the defined grammar rules and create abstract syntax trees which are used to digest and process the SMARTS strings within the FFXML.
FF Applying, step 1: Preparing a topology
Thus far in the advanced section, we have discused what happens when we write an FFXML, read an FFXML, and create the FF object from the FFXML, including a discussion on the SMARTS object and the grammar used in analyzing SMARTS patterns. At this point, we have a FF object.
Now, we move onto the apply step. First, we prepare the topology, where we aim to create an OpenMM.Topology object out of whatever input we were initially given. Within the apply function, we call _prepare_topology: if we have an OpenMM.Topology, we are already done. In addition, we erase the positions only to re-add them later. If we do not have an OpenMM.Topology, we call generate_topology, which converts parmed.Structure or mbuild.Compound objects into OpenMM.Topology objects by extracting the bonding and particle information from each. Editorializing, but there are a million and one different chemical topology objects that encapsulate a lot of the same core information about bonding and particle information, it’s just a matter of getting the API to work with each other and writing the converters. Once this idea is well-ingrained, then it’s somewhat easy to interconvert between all the different chemical topology objects, provided you learn the two API involved.
At this point, we have created an OpenMM.Topology object by parsing and converting bonding and particle information. Now, we move to the atomtyping step.
FF Applying, step 2: Atomtyping
At a glance, it seems like all we call is self.run_atomtyping, but there are many calls underneath that. The gist is that we can map each particle in our system to an atom type.
In run_atomtyping, we call a couple methods. One method involves residue mapping, which is largely template matching. If you already found the atom types for one ethane, you can quickly copy that atomtyping information to the other ethanes in your system without having to re-run all the SMARTS matching. The other method is find_atomtypes, whose code is found in another file here, atomtyper.
Within the entire atomtyping process, we pass along a typemap dictionary that relates the atom’s index to its blacklist and whitelist. For a given atom (its index), we keep track of the overrides in the blacklist, and the possible atom types in the whitelist. This is used at the end of the atomtyping process, but we need to pass this dictionary around the various methods and sub-methods within Foyer.
find_atomtypes starts by calling _load_rules. Before I explain the function, I will describe the change in terminology.
- A rule is a general umbrella term that refers to the atom type and its associated SMARTS pattern.
- A rule_name is the name of atom type.
- A SMARTSGraph is the digitized graph of the SMARTS pattern
- SMARTS is the SMARTS pattern in our FFXML within the
defattribute, also referred to as the SMARTS string or SMARTS definition
Within _load_rules, we iterate through our FF object. Specifically, for every atomTypeDefinition, we get the rule_name and SMARTS. We convert the SMARTS into a SMARTSGraph, then store this information in a dictionary called rules, which relates the rule_name to the SMARTSGraph
Sidenote: The SMARTSGraph
The SMARTSGraph is a subclass of the NetworkX.Graph, the class is defined here, in smarts_graph.py. A SMARTSGraph object contains information about the atom type and SMARTS string it encodes - the rule_name, overrides, and the graphical representation of bonding topology (nodes are particles, edges are bonds). Additionally, the SMARTSGraph contains the abstract syntax tree that is generated when our FF.parser (the LALR parser with the GRAMMAR from earlier) parses the SMARTS pattern’s grammar into the abstract syntax tree. For each atom type, we will have a SMARTSGraph object.
Within this module and class are all the subgraph matching operations used to identify the possible atom types. At this point in the post, we do not need to cover the different operations here, just the properties and significance of the SMARTSGraph.
Back to atomtyping
Before this tangent, we were talking about the load_rules method, which is called from find_atomtypes. When we load rules, we are creating a dictionary that relates the rule_name (atom type string) to its SMARTSGraph (graph-ified SMARTS pattern). Now we have this dictionary, we return to find_atomtypes.
Even though we have created a rule for every atom type outlined in the FFXML, we can do some simple acceleration to the atomtyping, which involves the simplest SMARTS patterns whose only pattern defines a singular atom type with no bonding context. This is the “low hanging fruit” to match within a FF, so this can be handled quickly. Furthermore, if there are elements in the FFXML, but those elements are not present within our chemical topology, we can toss those elements and their associated rules out the window - that element is not in our topology, so why should we even try to match something that definitely isn’t present? This pruning process helps narrow down large FFXMLs into smaller, faster-to-match FFs.
Now, we call _iterate_rules, whose code is outlined here. In this function, we iterate through each rule (SMARTS definition) and find the atoms the fit this rule, and iterate through those fitted-atoms. For the fitted-atoms (atoms that fit this SMARTS definition), we add the rule_name (atom type) to the whitelist, and add the overrides to the blacklist.
We will focus on rule.find_matches, because this goes into the graph matching. Remember, a rule is a SMARTSGraph object, and find_matches can be found here
First, _prepare_atoms involves initialzing typemap properties and looking at ring sizes. _prepare_atoms calls _find_chordless_cycles We have a bonding network, but part of SMARTS involves identifying the size of a ring. Within _find_chordless_cycles, we look at each node within our graph (atom within our system), and aim to build out a cycle by looking at the atom-in-question’s neighbors, and then look at those neighbors. We repeat this process until we can actually close the ring. Side note: chordless means a ring without any bridges within the cyclic strucure. I think chordless poses some issues with ring finding, as a ring with a chord could actually yield multiple rings (the rings that use the chord to close the loop, or the rings that skip the chord)
After _prepare_atoms, we create the topological graph, a NetworkX.Graph, from our OpenMM.Topology.
For each rule (a graph), we create a SMARTSMatcher object as a property. In the workflow of graph matching, NetworkX defines various graph matching algorithms as Python classes, and our SMARTSMatcher class inherits from the NetworkX VF2 algorithm. The NetworkX documentation is here. What this means is that our SMARTSMatcher class takes some of the functions from the parent class, but now we override them to fit our chemical matching problem. It’s important to pair these rules and SMARTSMatcher objects together such that the SMARTSMatcher knows what it is trying to match.
While we create the SMARTSMatcher object, we have to define the node_match, saying when we’ve actually found matching nodes in corresponding graphs.
Defining a node match via atom_expression and atom_id matches
node_match is a method within the SMARTSGraph class that gets passed into the SMARTSMatcher.__init__, and can be found here. Compare a host and pattern node, check if their expressions match (atom_expr_matches).
atom_expr_matches is another method within the SMARTSGraph class that is found here. At this point, we are utilizing some strings that were outlined and parsed from our SMARTS grammar. This is a lot of if-statements that analyze the expressions as defined within our abstract syntax trees (the AST that gets created when we parsed the grammar for each SMARTS definition). The expressions refer to some sort of operation or relationship between nodes. Similar to mathematical order of operations, we are trying to “unwrap” these different operations and operations-within-operations to get to the terminal point of comparison. If our AST is very complex with a lot of nested expressions (in math, this would be lots of parenthesis within parentheses), we will end up calling atom_expr_matches a bunch to dig through the layers of our AST onion. Some possible AST nested expressions could involve chemical branching in compounds or and/or logical expressions.
Eventually, we reach the terminal end point, where we call self._atom_id_matches, a method defined here. Within this routine, we are looking at the specifics of our atom-in-question:
- What is the label? Symbol? Atomic Number?
- How many neighbors does it have?
- Is it in a ring? If so, how big should the ring be?
atom_id_matches doesn’t just return the output of another routine, atom_id_matches is the final routine (like base case in recursion) that will finally return you a True or False. Once this method returns a boolean, this boolean propagates back up through all the different atom_expr_matches routines, which FINALLY gives you something that _node_match can finally return True or False.
After defining the match criteria, we have to iterate
Back to the _find_matches method, we have now reached this loop. The technical jargon is we are performing subgraph isomorphisms. For our chemical system, we have a huge topological graph. For each SMARTS definition or rule, we have a smaller subgraph. The aim of the subgraph isomoprhism is to identify where, within the topological graph, the subgraph may fit. This is the technical jargon of finding the atom types in our topology, just cast into a graph problem. The logic and code of finding a match was outlined in the section above. Most of the subgraph matching is handled within the line that actually declares the loop self._graph_matcher.subgraph_isomorphisms_iter. Some of code may not be found within Foyer, because we are inheriting code and routines from the API in NetworkX, though some do get overridden like how we define node_matches or how we iterate in the VF2 algorithm.
Remember that the purpose of this subgraph isomorphism iteration, which is within find_matches, which is within atomtyper._iterate_rules, is to return or yield an atom index for which we can modify the white and blacklists.
Returning back out to iterating rules
Summarizing, we are iterating through every rule, trying to find matches via subgraph isomorphisms. The previous sections laid out how we utilize NetworkX functionality to utilize the VF2 algorithm for subgraph matching, which is all utilized in iterate_rules when we call rule.find_matches, where the subgraph matching code is used for the rules (SMARTSGraph objects).
Once we HAVE found matching atoms, we add to their white and blacklists. The possible atomtypes go in the white list for that atom, and the overrides associated with those atomtypes go in the black list.
All this information gets stored in the typemap, and then we return back out to find_atomtypes
Resolving atomtypes
After iterating through all our rules, finding atom type matches, updating white lists, and upating blacklists, we now have to resolve the atom types to specifyc a single atom type for each atom.
At this point in the code, we are here. In resolve_atomtypes, we iterate through every atom in our typemap. For each atom, we subtract the blacklist from the whitelist. Our whitelist lists all the possible atom types, and the blacklist lists all the overriden atom types. Doing this (set) subtraction, there should only be one remaining atom type. For example, our atomtyping process could yield a whitelist of C1, C2, C3, and C4. Also in this process, we have identified the overrides to be C3, C2, C1. Thus, the remaining C4 takes priority over all the other atom types, and this atom gets atomtyped as C4.
If the set difference doesn’t yield one remaining atom type, it means
- There were multiple atom types that fit this atom. There were were insufficient overrides to narrow down the whitelist to just one atom type. As a FF developer, you might have just stumbled across an atom that you didn’t expect to satisfy multiple atom types, and now you need to update your FF for a new override.
- There were insufficient atom types and none fit the atom. Your chemical system in question has a particular chemical context not yet accounted for within the FF and SMARTS definitions. If you KNOW which atom type it should have been, you need to go back and update the SMARTS definition in your FFXML for that atom type. If you did NOT know which atom type it should have been, you need to make a new atom type and enumerate FF parameters for it within your FFXML.
After resolving within our typemap, we have to apply this mapping scheme back to our OpenMM.Topology, where we are finally assigning the atom types.
Parametrizing the system
If the code made it this far, we know the atom types for each system. We now need to parametrize the bonded and nonbonded interactions within our system, according to the FF.
This is done here, where we are adopting a lot of code from OpenMM.Forcefield.createSystem. Within Foyer.Forcefield.createSystem, we identify all the possible bonds, angles, and dihedrals in our system, which updates data and self._systemData
After identifying the bonds, etc. to parametrize, then we actually parametrize them. Back when we were initializing our FF and reading the FFXML, we didn’t actually create the Force objects, but rather ForceGenerators. The ForceGenerators contained the parameter information, but never said which bonded entity had that parameter information. This is done here, where we call force.createForce, where we are unpacking all the parameters and assigning them to each bond, angle, and dihedral within our system. force.createForce is a method that all OpenMM.ForceGenerator objects know (like here). Within this code, you can see where the ForceGenerator is now adding particular information, specifying the atoms involved, the reference length, and the force constant.
At this point, we have a fully parametrized OpenMM.System - all atoms have atom types, all bonded identities have been found, and all bonded (and nonbonded) entities have parameters associated with them. This would actually be sufficient to run a simulation with OpenMM, but our code seeks flexibility across many engines.
As a side note for Urey-Bradleys (angle terms with a 1-3 bond), the OpenMM code appears to create separate angle forces and separate bonds. There ends up being a singular HarmonicBondForce that encapsulates both 1-2 and 1-3 bonds, but this messes up some logic later in the code. So we create a second HarmonicBondForce that removes the 1-3 from the first HarmonicBondForce, and puts the 1-3 bonds in the second HarmonicBondForce.
Returning to the OpenMM.System, we want to make this flexible across different engines, so we use Parmed to convert the OpenMM.System into a Parmed.Structure here. From the parmed.Structure, we can utilize the ParmEd API to write to different simulation engines, or a user can easily dump out the contents of the parmed.Structure in a format for a simulation engine of choice - all the parametrized, topological, atomic, and position information is there, find how to access it and then find out how you should probably write to a file format.
FF Applying, (optional) step 4: Validation
Historically, modelers had to be extremely meticulous to hand-define every bond, every angle, and every parameter in their system, each time they wanted to perform a simulation. Because this is automated by the Foyer API, it helps to incorporate sanity checks to make sure everything is defined. There are some validation checks here, back when we enumerated all bonds and angles in systemData, we now compare them to the bonds and angles in the parmed.Structure. If it was parametrized, it would carry over into the parmed.Structure. If it wasn’t, then there would be something in systemData not in the parmed.Structure.
This is the bare-bones sanity check for building a model, actual validation of the parameters and numbers themselves is harder to do without human eyes scrutinizing everything.
After the Foyer workflow
We have a fully-parametrized parmed.Structure. If we don’t, we should hopefully know where in the process we missed things - ill-defined SMARTS patterns, missing atomtypes or definitions, missing parameters, poorly-defined bonding, or poorly-defined particle names, among others.
Now we have the model and need to run a simulation, which will require:
- Writing/converting the model (
parmed.Structure) to a form that fits your simulation engine - Writing the simulation parameters (integrators, timesteps, thermostats, barostats, nonbonded instructions, constraints, cutoffs), if not already specified in the model.
In addition to the various formats supported in ParmEd, mBuild also has additional formats that extract information from the ParmEd structure here
Conclusion
To varying levels of detail, I have described the Foyer API, the routines, hidden routines, classes, and how the routines interact or call each other. There is a wealth of functionality derived from mBuild, ParmEd, OpenMM, and NetworkX, so it may help to understand those API as well.
Many Foyer modules and functions are hidden away for users, but the routines are sufficiently modular and well-defined for someone to hopefully understand issues and submit pull requests to build the API into an even more robust tool for molecular modelers.
As Foyer changes, this guide may become out-dated, but until then, I hope this serves as a useful tool for new users, maintainers, and developers.
Credits
I am not the original developer of Foyer. I help maintain and develop the package (as of September 2019 at least). Christoph Klein and Janos Sallai are the original developers, and I advise others who want to truly understand the package to read Christoph Klein’s Ph.D. Thesis at Vanderbilt University. The relevant publication can be found at DOI:<10.1016/j.commatsci.2019.05.026>. Further, this package was largely built upon the contributions of others at Vanderbilt University and other institutions.